Parallels desktop. правильная виртуализация под mac: 10 советов по использованию виртуальной машины
Содержание:
- Shared Profile Tool
- Additional information
- Как тюнинговать Parallels Desktop
- Как интегрировать виртуальную машину в macOS
- Чем Parallels лучше Boot Camp или VirtualBox?
- Possible solutions for Windows virtual machines
- Share Mac volumes
- Shared Applications Tool
- Resolution
- Самые интересные фичи Parallels RAS
- The Basics
- Совет 5. Настройка Parallels Desktop для игр
- Shared Folders Tool
- Information
- Совет 3. Экономим заряд аккумулятора MacBook
- Download and install Windows automatically
- Parallels Desktop для Mac с M1
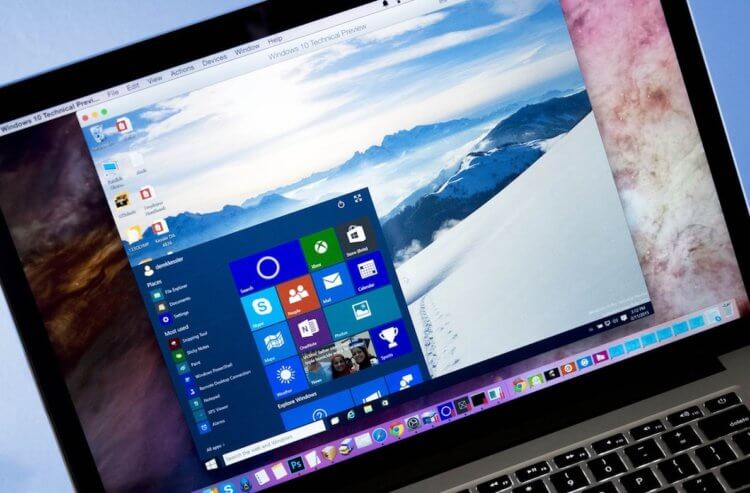
- Как установить Windows в Parallels
- Как мы искали в компанию человека с инвалидностью
- Как запустить Windows на Mac с M1
- Все собеседования и найм работников у нас теперь удаленные
- Голова из интернета
- Checking Software Settings
- Совет 2. Используйте функцию Приостановить
- Install Windows from your source
-
Shared Profile Tool enables you to share your Mac desktop, pictures, documents, downloads, music and videos with your virtual machine, which allows you to access them right from Windows.
With this tools enabled the virtual machine’s desktop will display the icons present on the macOS Desktop, and the My Documents folder will contain items stored in the Documents folder on your Mac. The other folders will behave in a similar way. It means that Windows home folders will be linked to Mac home folders.
Warning: If you delete any macOS file from the Windows desktop when the macOS desktop sharing is enabled, you will not be able to find it in macOS Trash or Windows Recycle Bin. The file will be deleted from your computer permanently.
Note: To enable the Shared Profile functionality, you should share all Mac disks or at least your Mac Home folder.
Please follow the steps below to enable Shared Profile Tool:
- Open virtual machine window (Do not click Start).
- Open virtual machine configuration > switch to Options tab > Sharing.
- Tick Shared Profile checkbox and change Share Folders to All Disks / Home folder only.
Additional information
The networking technology basics below should help you decide which networking mode to choose.
When talking about networking we often use terms like IP address, DHCP Server, subnetwork, and many others. The first three are the most important in our case.
IP address
A numerical label assigned to each device (e.g., computer, printer) participating in a computer network that uses the Internet Protocol (IP) for communication.
IP addresses are represented in dot-decimal notation, which consists of four decimal numbers, each ranging from 0 to 255, separated by dots, e.g., 192.168.0.10. Each part represents a group of eight bits of the address. IP addresses, like regular addresses, are used by computers and other devices to communicate with each other.
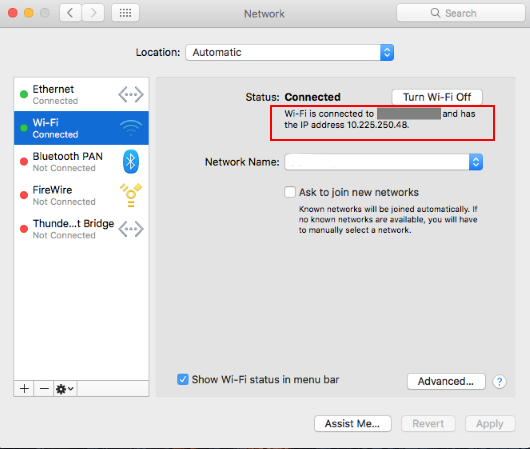
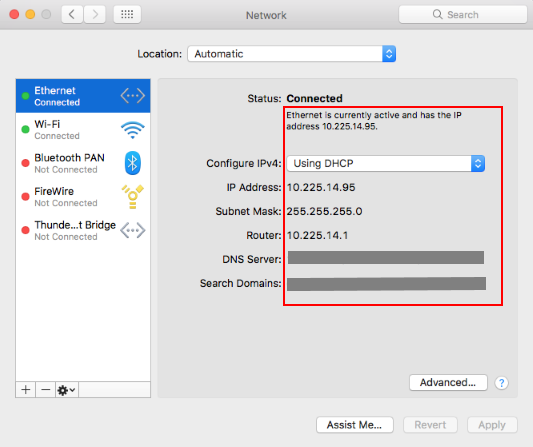
An IP address can be assigned to a network device (e.g., computer, printer, tablet, smartphone, etc.) either manually by a user or a System Administrator, or automatically by a DHCP server. To see the IP address of your Mac, go to System Preferences > Network.
Your Mac will normally use either a Wi-Fi connection:
or an Ethernet (cable) connection:
DHCP server
A computer or a specific network device (router) that maintains a database of available IP addresses and configuration information. When the server receives a request from a client device (e.g., computer, printer), the DHCP server determines the network to which the DHCP client is connected, and then allocates an IP address that is appropriate for the client, and sends configuration information appropriate for that client.
In an average home network your router will work as a DHCP server that automatically assigns the IP addresses to all your network devices so that you do not need to worry about the IP addresses and other necessary settings for your Mac or a smartphone.
Subnetwork (subnet)
A logically visible subdivision of an IP network. The practice of dividing a network into two or more networks is called subnetting.
All computers that belong to a subnet are addressed with a common, identical, most-significant bit-group in their IP address. For example, a typical home subnet will have IP addresses in the following range: 192.168.0.1-255. This means your Wi-Fi router will have an IP address of 192.168.0.1, your MacBook Pro will have an IP address of 192.168.0.10, your smartphone — 192.168.0.20 and your wireless printer — 192.168.0.30. To learn more about the settings of the DHCP server, please read your router’s documentation.
Traffic between subnetworks is exchanged or routed with special gateways called routers, which constitute the logical or physical boundaries between the subnets.
Network adapters (NIC) types in virtual machine configuration explanation
In virtual machine configuration you can choose between 4 types of network interface card (NIC):
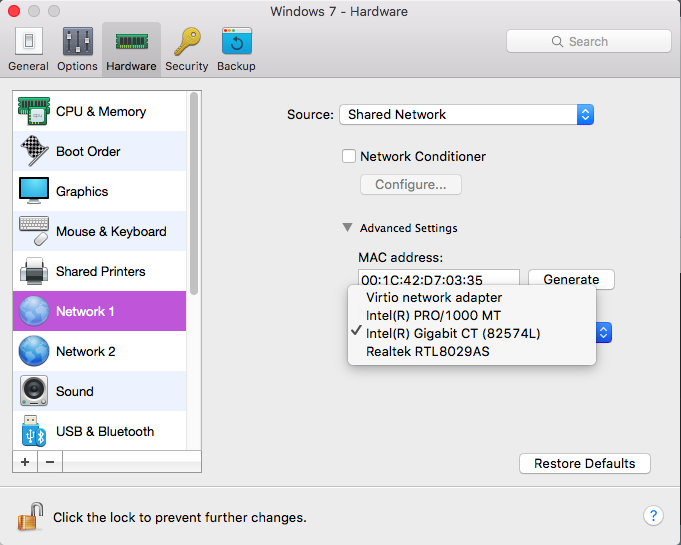
Virtio network adapter is the fastest card. However, it works only in Linux and BSD guest operating systems. It is a default adapter for Linux-based OSes.
Intel PRO/1000 MT is a default network adapter for Windows and Mac OS X virtual machines. It works in all operating systems. It also counts a checksum and splits packages. Thus, it allows to increase the network performance.
Intel Gigabit CT (82574L) support for this network interface was added in Parallels Desktop 11 for Mac. This is Intel’s e1000e Ethernet driver.
Как тюнинговать Parallels Desktop
С Parallels Desktop пользователи знакомы более 10 лет. До сих пор потребность в работе с Windows (у кого-то Linux) на Mac не теряет свою актуальность. Дизайнеры, бухгалтеры, геймеры, разработчики, музыканты, полицейские, список пользователей можно продолжать бесконечно.
С каждой новой версией Parallels Desktop разработчики стремятся сделать свой продукт лучше предшественников. Как говорится, нет предела совершенству. Мысли о том, как сделать свою машинку быстрее, выше, сильнее, не покидают пытливые пользовательские умы ни на минуту. Делимся с вами полезными фишками, которые помогут выжать из вашего яблочного помощника все соки.
Как интегрировать виртуальную машину в macOS
Вы можете начинать пользоваться Windows уже сейчас, но, если вы хотите использовать Parallels по полной, предстоит выполнить ещё несколько шагов.
В правом верхнем углу окна вы увидите восклицательный знак. Это значит, что нужно установить Parallels Tools. Так вы сможете перемещать курсор мыши между macOS и Windows одним движением, а также получать доступ к файлам Mac прямо из Windows. Чтобы начать, нажмите на восклицательный знак и выберите «Установить Parallels Tools».

Это смонтирует виртуальный CD-диск в виртуальной машине Windows. На всплывшем окне выберите «Install Parallels Tools».
Установка займёт несколько минут, а затем Windows нужно будет перезагрузить. После всё будет готово – виртуальная машина будет интегрирована с macOS.
Вы сможете делать следующее:
- Перемещать курсор мыши в Windows быстро и просто.
- Скопированное в Windows можно вставить в Mac и наоборот.
- Документы, Загрузки и Рабочий стол Windows связаны с соответствующими папками macOS. Измените файл в одной системе, и он изменится и во второй.
- Если вы пользуетесь Dropbox или iCloud в macOS, эти папки будут доступны в Windows Explorer.
- Если вы пользуетесь OneDrive в Windows, он будет доступен в macOS.
- Некоторые программы Windows отображаются в доке Mac.
Это даже не все возможности, и каждую из них можно изменить или отключить в настройках.
Отключить общие папки можно на вкладке «Общий доступ».
На вкладке «Applications» можно убрать программы Windows из дока Mac.
Можно настроить ещё много всего, но экспериментировать вы будете сами.
Чем Parallels лучше Boot Camp или VirtualBox?
Конечно, вы можете использовать Boot Camp, но для этого вам понадобиться каждый раз перезагружать свой компьютер, чтобы воспользоваться Windows. Parallels запускает Windows прямо в macOS, используя Виртуальную Машину. Она позволяет быстро переключаться между Mac и Windows. Вы даже сможете использовать две системы сразу и запускать Windows из дока Mac.
Виртуальные машины сложны, но с помощью Parallels вы сможете легко всё настроить. Есть и другие варианты, однако программа Parallels разработана специально для пользователей Mac. Да, она дороже, но вместе с этим и намного удобнее.
Possible solutions for Windows virtual machines
- Install all pending Windows updates. Then restart a virtual machine two-three times to apply changes completely.
-
Users who use their virtual machines rarely may encounter slowness and other performance issues after starting a virtual machine if it hasn’t been used for a long time. From our side, we recommend giving Windows some time to finish doing necessary internal jobs and other required maintenance tasks. If Windows still working slowly, check Task Manager as described below to find out the reason for CPU consumption.
The virtual machine’s CPU consumption directly depends on guest operating system usage. If you notice that your virtual machine consumes a high amount of CPU resources, check CPU consumption in the guest operating system in Task Manager (right-click on Windows taskbar > Task Manager):
Once you determined what process of Windows program consumes a sufficient amount of CPU, you may refer to the software manufacturer’s knowledge base to find more information. For some types of software, like video or photo editing, CAD, or video games, high CPU usage is a common operating condition.
- Try to run a clean boot to exclude possible third-party applications influence. Note: in step 3 keep Parallels services enabled.
- Try checking a Windows virtual hard drive as described in KB115549.
-
Using Map Mac Volumes to Windows option you can set Parallels Desktop to automatically mount Mac storage devices and volumes to Windows. That way you can access the contents from both macOS and Windows.
With this option enabled, the following items are automatically mounted to Windows:
- Removable drives: External storage devices, such as USB hard disks and USB flash drives.
- CD/DVD drives: CD and DVD drives or CD/DVD images (files most commonly ending in .dmg, .iso, and .img.).
- Network folders: Folders shared over the network.
To enable Map Mac Volumes to Windows option:
- Open virtual machine configuration > switch to Options tab > Sharing.
- Tick Map Mac Volumes to Windows checkbox.
-
You can access macOS applications from within Windows and you can access Windows programs from macOS. For example, if you locate a file using the Open menu in a Windows program and decide you would rather open the file using a macOS application, you can. Shared Applications Tool enables you to specify default applications for certain types of files, so that you can open some types of files in Windows applications by default, and others — in macOS.
Please follow the steps below to enable Shared Applications Tool:
- Open virtual machine window (Do not click Start).
- Open virtual machine configuration > switch to Options tab > Applications.
- Tick Share Windows applications with Mac and/or Share Mac applications with Windows.
Resolution
- Make sure your Mac is connected to the internet, Windows will not be able to access the internet if it’s disconnected or inaccessible on the Mac side.
- Before going any further please take a snapshot (Actions > Take Snapshot) to revert to a pre-troubleshooting point.
- Reinstall Parallels Tools.
- Perform clean boot in Windows by disabling 3rd party applications’ services including 3rd party antivirus software which may have a negative impact on a network driver’s installation.NOTE: in step 3 keep both Parallels Tools services enabled.
If this helped and internet connection restored, enable all services back one-by-one to identify the problematic 3rd party application.
- Go to the virtual machine’s configuration > Hardware > Network > Source > Shared Network (Recommended) option should be set by default.
If you have already got a Shared network set but still experience network issues in Windows switch it to Bridged Network: Default Adapter and verify if the internet is working in any of these modes.
If the internet is accessible in one of the modes — either Shared or Bridged but having a different connection type set doesn’t suit your needs, proceed to additional troubleshooting. - Open Command Prompt in Windows by clicking on Start menu and typing in cmd, then hit Enter.
Try pinging any Parallels server by entering the following command:
A normal output looks somewhat like this:
If you get the following reply:
Reset Windows TCP/IP protocol using the following commands:
Then close Command Prompt window and restart Windows.
If after Windows restart internet is not working, open Command Prompt again, release and renew IP address by entering the commands below:
- If the above steps do not help, in Windows open Device Manager (right-click Start menu and select Device Manager).
In Device Manager go to Network adapters tab and expand it. Check the name of the network adapter. It should be identical to the name in the virtual machine’s configuration (the virtual machine’s configuration > Hardware > Network > Type).
If instead, it is something like Parallels Ethernet Adapter #…, it means the driver was installed incorrectly and needs to be updated.
To do that right-click on the adapter > click Update driver > Search automatically for updated driver software. Windows will try to update the driver.
- If none of the above helped, scan your system for integrity violations.
- When the issue is resolved by going to Actions > Manage Snapshots > choosing the snapshot > pressing Delete > Yes.
Самые интересные фичи Parallels RAS
Продакт-менеджер Parallels Евгений Корепанов рассказал о наиболее интересных фичах решения по доставке приложений и инфраструктуры виртуальных рабочих столов Remote Application Server и его основных конкурентных преимуществах. Далее рассказ от первого лица. Enjoy!
Parallels RAS позволяет удаленно доставлять на клиентские девайсы все, что запускается на Windows-серверах и десктопах. Это то, ради чего существует наш продукт
Неважно, Mac у пользователя, Windows, телефон с Android или iOS — использовать приложения, опубликованные через Parallels RAS, можно с любого устройства. В этой статье расскажу о наиболее интересных фичах платформы.
The Basics
Virtual machine performance is to a computer’s hardware resources. It is also very important to allocate even shares of hardware resources between the host operating system (macOS) and guest (VM) according to the recommended system requirements of both systems.
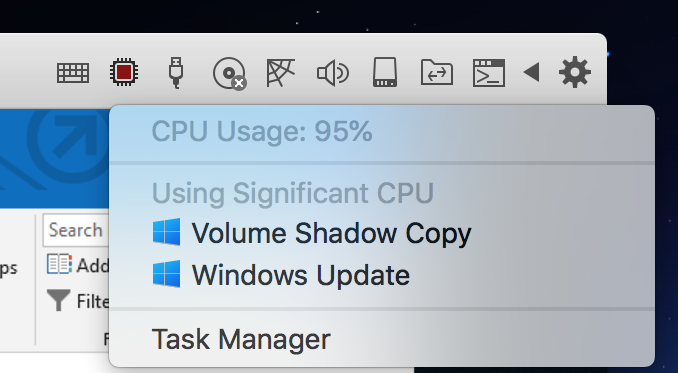
Note: starting with version 14, Parallels Desktop for Mac brings a new feature: CPU Usage Monitor. Look at the VM window tray and CPU Usage Monitor will light up in red when CPU usage in Windows is above 70%. Click on CPU Usage monitor to see what processes in Windows use the computer’s CPU. Clicking on a process name will open Windows Task Manager showing selected process:
The computer’s performance mostly depends on several hardware components: CPU, RAM, and hard disk. While CPU cannot be replaced at hand, most of Mac computers enabled for RAM and hard disk upgrade.
Совет 5. Настройка Parallels Desktop для игр
Parallels Desktop можно настроить так, чтобы гостевая Windows показывала в играх максимальное быстродействие.
Процессоры свежих Маков имеют по 4-6 ядер. Если вы собираетесь поиграть в виртуальной машине, вам нужно переключить все имеющиеся ядра на поддержку гостевой ОС.
Для этого достаточно включить профиль «Только игры».
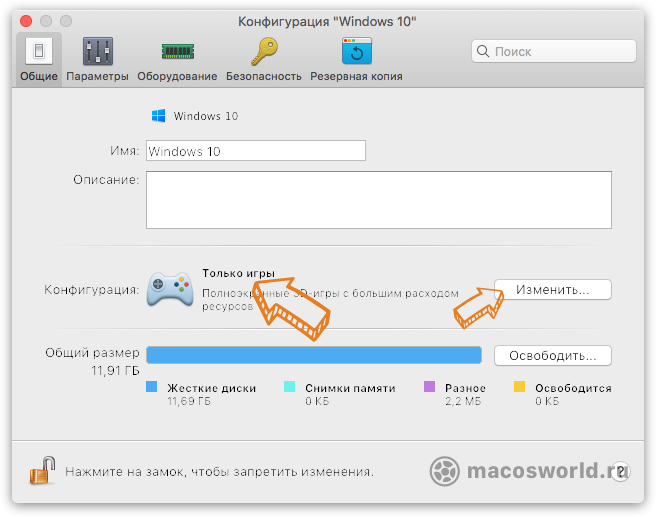 Переключение виртуальной Windows 10 в «игровой режим»
Вы можете задействовать для игр то количество процессоров, которое посчитаете нужным. Наибольший эффект от этой опции получится в играх, которые поддерживают многопоточность.
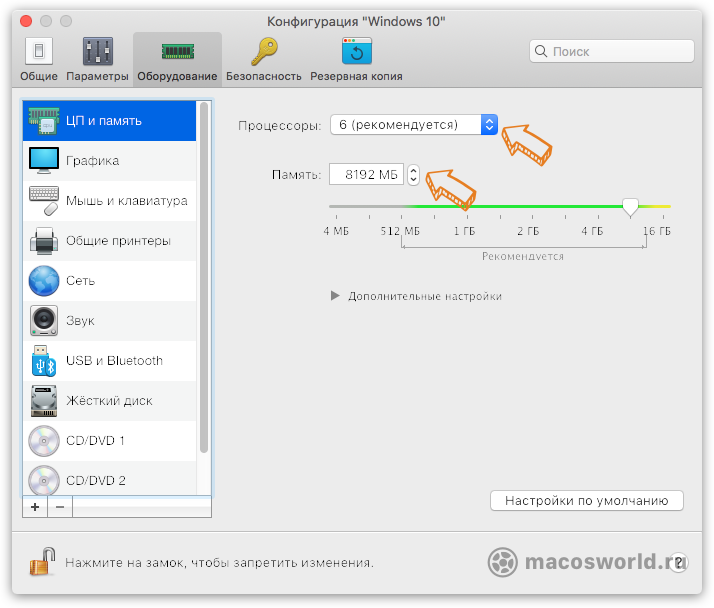 «Игровой режим» включает все ядра процессора и увеличивает объем ОЗУ до 8 ГБ
-
Shared Folders Tool enables you to share Mac folders with the virtual machine and vice versa. With this tool, you can access your Mac folders from the virtual machine and virtual machine folders from macOS. You can also choose custom folders to share.
Please follow the steps below to enable Shared Folders Tool:
- Open virtual machine window (Do not click Start).
- Open virtual machine configuration > switch to Options tab > Sharing.
- Set Share Folders to the desired value.
- Choose the Custom Folders if you need.
If you want to share Windows folders with Mac check Access Windows folders from Mac and Mount virtual disks to Mac desktop in the Share Windows pane. Windows volumes will appear on the Mac Desktop.
Information
Virtual machine can use three different networking modes depending on user needs:
To switch between network modes go to menu bar when virtual machine is active > Devices menu > Network.
Note: configuring Shared and Host-Only networks is available in Pro and Business Editions in Parallels Desktop Preferences > Network.
This is the default and recommended network mode for virtual machines, as it works «out of the box» and does not require any specific configuring. When this networking mode is used Parallels Desktop will work as a virtual router for your virtual machine. As a result:
- Parallels Desktop creates a separate virtual subnet with its own virtual DHCP server running in macOS.
- A virtual machine belongs to that virtual subnet with its own IP range.
- A virtual machine is not visible in the real subnet the Mac belongs to.
- A virtual machine use full Internet access.
- If Mac is connected to virtual private network — VPN access is automatically shared with virtual machine.
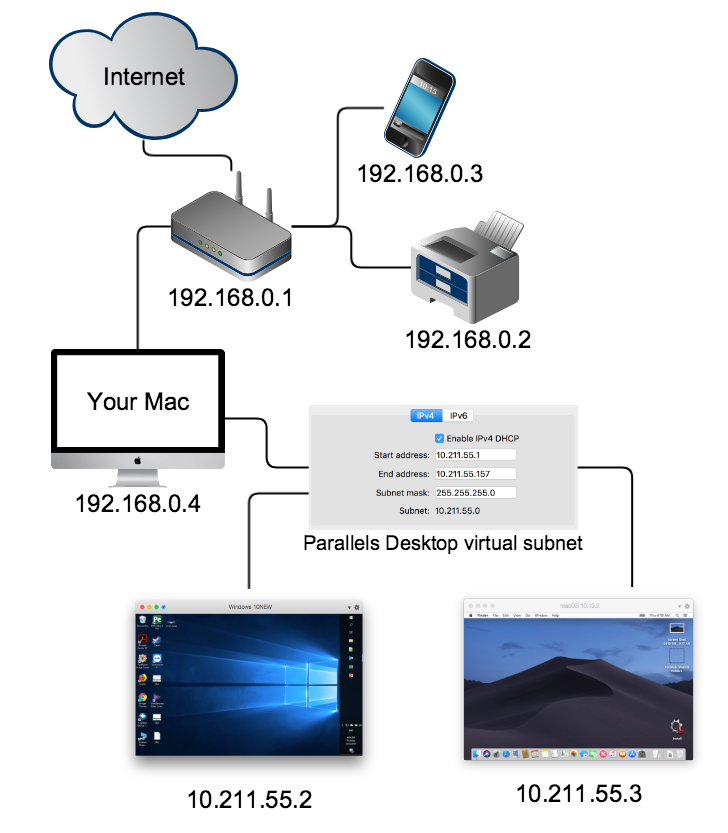
This network mode is suitable for most of the user needs.
Bridged Network
When this network mode is used, your virtual machine uses a virtualized network interface card with direct access to Internet. As a result:
- A virtual machine appears as a separate computer that belongs to the same subnet as the Mac it is running on.
- A DHCP server (e.g., your router) provides a virtual machine with an IP address within the same IP range as other computers in the same subnet.
- A virtual machine can ping and see all computers in the subnet.
- Other computers can ping and see the virtual machine.

Note: when selecting this network mode Parallels Desktop is no longer responsible for any network connectivity issues.
Bridged network can be enabled on a particular network interface, such as Ethernet, Wi-Fi or other Mac network interfaces.
- Bridged: Ethernet corresponds to your Mac Ethernet adapter
- Bridged: Wi-Fi corresponds to your Mac Wi-Fi adapter. (may work unstable depending on router settings)
- Bridged: Default Adapter corresponds to whichever network adapter is chosen as the default (the first in the list System Preferences > Network) on the Mac.
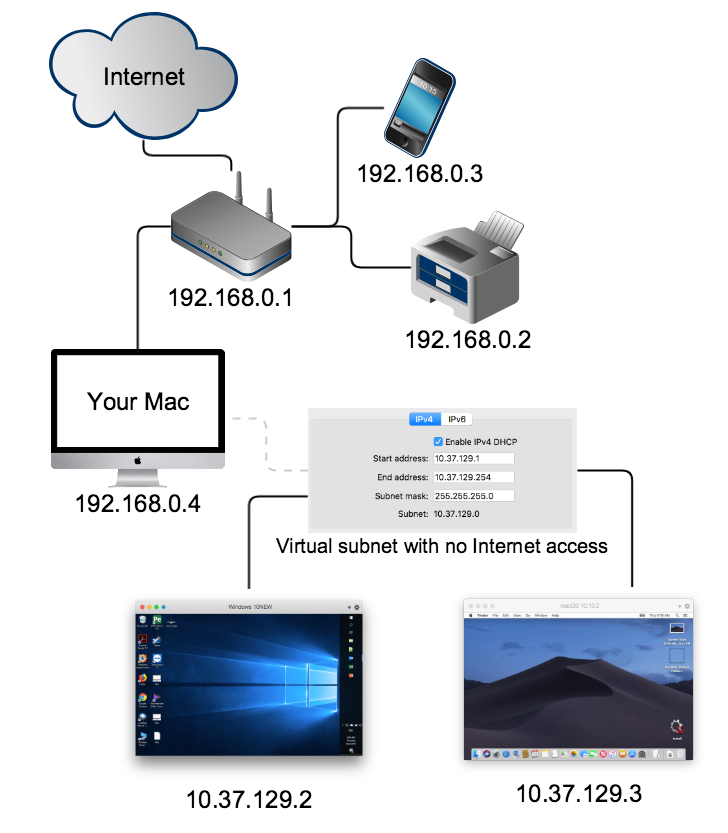
Host-Only Network
This mode is similar to Shared Network except that this virtual subnet (10.37.129.x) is isolated from the outer world. As a result, the virtual machine that is working in host-only mode can only see and ping other virtual machines and communicate with the gateway (10.37.129.1).
Совет 3. Экономим заряд аккумулятора MacBook
Этот трюк хорош для обладателей 15-дюймовых MacBook Pro. В них есть два видеоадаптера — интегрированный и дискретный. Дискретная видеокарта — один из самых прожорливых компонентов. Если ваша цель — максимальная автономность и длительное время работы компьютера от батареи, лучше отключить дискретную карту в Windows 10.
Для настройки Parallels Desktop на экономичный режим работы, отключите 3D-режим в:
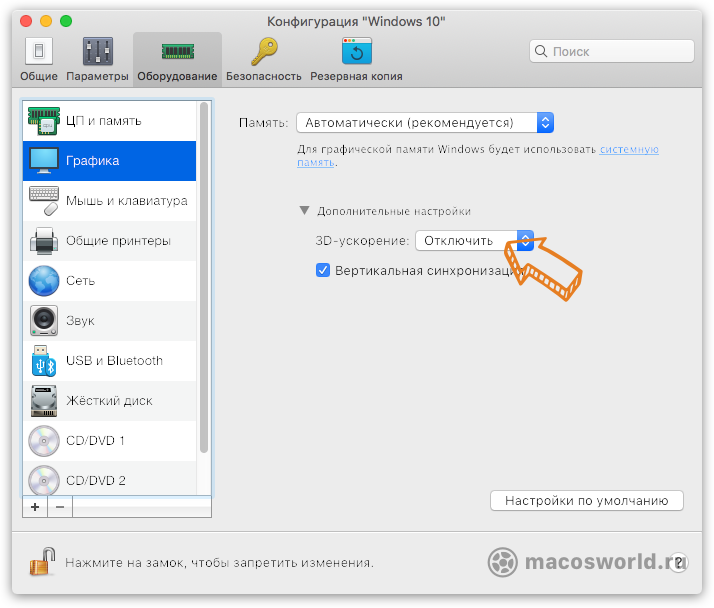 Отключение 3D-ускорения экономит батарею на MacBook Pro с дискретной графикой
Мы отключили 3D-эффекты, но пока не уменьшили количество видеопамяти, отведённой для виртуальной машины: сохранилось её значение по умолчанию — в нашем случае это 256 Мб. Поскольку такой огромный объем для графики просто не нужен, имеет смысл отдать «лишнюю» память хосту.
Для отрисовки простого интерфейса Windows 10 хватит 32 МБ. Поэтому лучше установить это праметр в автоматический режим. В этом случае PD будет использовать минимальное количество памяти видеоадаптера.
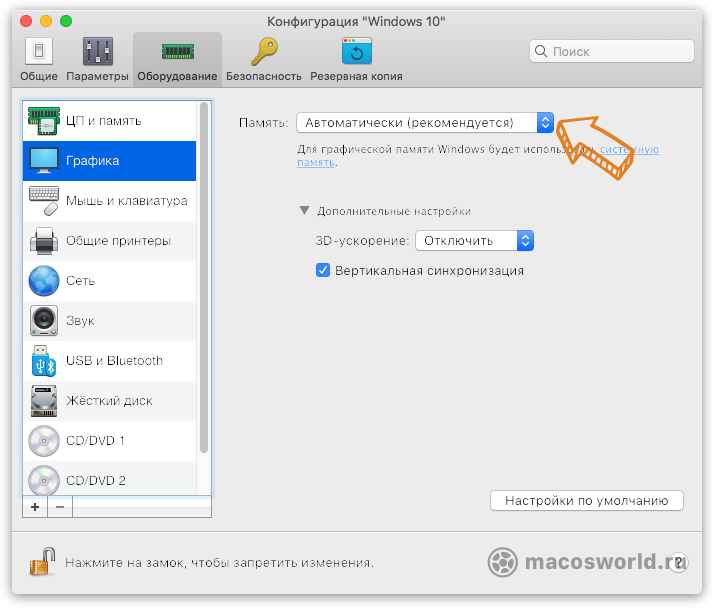 А «автоматическом» режиме Parallels Desktop использует минимально необходимое количество видеопамяти
Если же у вас Mac только с интегрированной видеокартой (13-дюймовые модели), то достаточно зайти во вкладку Оптимизация и уменьшить количество ресурсов, которое потребляет виртуальная машина.
По-умолчанию стоит значение «Без ограничений». Рекомендую поставить на «Средний».
 Определите, сколько ресурсов может потреблять виртуальная машина
Эти действия помогут выиграть 1,5-2 часа времени работы от батарейки. Правда, запускать при таких настройках что-то «тяжёлое» уже не получится. Но для приложений, использующих 3D, есть специальные настройки (см. Совет 5).
Download and install Windows automatically
You can easily download Windows 10 via Parallels Desktop at the first Parallels Desktop start.

Click on the Parallels icon in the Mac menu bar > New… > Get Windows 10 from Microsoft > Download Windows 10.
If you are running an earlier version of Parallels Desktop for Mac, visit this page to Download Windows 10 from Microsoft.
For earlier versions of Windows, please refer to retail stores or authorized online resellers, including Amazon.com.
Note: Get Windows 10 from Microsoft option is not available in Parallels Desktop for Business. It is advised to deploy a custom virtual machine pre-configured for your business environment (see KB 120093).
Please note that Parallels Desktop does not include a Microsoft Windows license. If you don’t have a Windows copy, you can purchase Windows 10 from the Microsoft Online Store:
- Buy Windows 10 Home
- Buy Windows 10 Pro
Note: visit this page if you need help to choose Windows 10 edition: Home or Pro.
Parallels Desktop для Mac с M1
Parallels Desktop получила поддержку ARM-версии Windows и M1
Может показаться, что сравнение, которое приведено ниже, выглядит не совсем честным. У разработчиков нет единого бенчмарка, на который бы они опирались, а в сравнении используются разные модели Mac. Однако разработчики выбрали сравнение по принципу «из крайности в крайность». MacBook Air здесь служит как эталон энергоэффективности, а MacBook Pro на базе процессора Intel Core i9 – как эталон производительности. Так что всё ок.
- Энергопотребление сократилось на 250% (по сравнению с MacBook Air с процессором Intel);
- Производительность DirectX выросла на 60% (по сравнению с MacBook Pro с процессором Intel и графикой Radeon Pro 555X);
- Производительность виртуальной машины выросла на 30% (по сравнению с MacBook Pro с процессором Intel Core i9).
В общем, как видите, апгрейд Parallels Desktop для Mac на M1 получился и вправду довольно ощутимым – хоть с точки зрения производительности, хоть с точки зрения энергоэффективности. Поэтому можно рассчитывать на высокий уровень быстродействия и автономности при работе в среде Windows, не переживая, что вычислительной мощности компьютера не хватит или он разрядился раньше времени.
Как установить Windows в Parallels
Когда вы запустите Parallels, начнётся создание новой виртуальной машины.
Если у вас уже готов диск или образ диска с Windows, нажмите «Установить Windows или другую ОС с DVD или из образа».
Диск или образ должны обнаружиться автоматически. Если нет – нажмите «Выбрать вручную», а затем «Продолжить».
Вам будет предложена установка «Express», которая автоматизирует процесс.
Выберите её или настраивайте каждый шаг вручную.
Затем вам нужно выбрать план: офисные программы, разработка ПО, тестирование ПО, дизайн или для игр.
Если вы выберите «Только игры», виртуальная машина будет использовать больше ресурсов. Выбирайте этот вариант только в том случае, если планируете играть в мощные игры (что не самое лучшее решение). Кроме того, если на вашем компьютере мало свободной памяти, программа будет работать медленно. Данную настройку можно поменять позже, но мы рекомендуем выбирать вариант «Офисные программы» сразу.
После этого вам нужно будет указать немного деталей: название виртуальной машины, её расположение, и хотите ли вы добавить иконку на рабочий стол.
Вы можете изменить другие настройки во время установки, но мы рекомендуем заняться этим потом. Пока просто нажимайте «Создать».
Начнётся установка Windows. Если вы выбрали «Express installation», то ничего делать не нужно. Если нет – несколько раз нажмите кнопку «Далее» и введите ключ как при обычной установке Windows.
Процесс установки может занять много времени, если вы используете жёсткие диски или DVD. Если установка происходит с SSD, то он займёт не больше нескольких минут.
В конце вы увидите интерфейс Windows. Мы почти закончили.
Как мы искали в компанию человека с инвалидностью
Даже выбирая заголовок для этой статьи пришлось столкнуться с дилеммой относительно правильности использованной терминологии. «Инвалид», «Человек с ограниченными возможностями», «Человек с инвалидностью», «Человек с ограничениями по здоровью» или «Человек с особыми потребностями», как правильно?
Например, Комитет ООН по правам инвалидов рекомендует использовать определение «человек с инвалидностью». Сами же люди с инвалидностью термин «инвалид» недолюбливают.
И действительно, английское слово «invalid» можно перевести на русский, как «немощный» или «болезненный», что, согласитесь, звучит мягко говоря не очень.
За мировой стандарт принято правило «people-first language» ─ когда говорят о ком-то, первым делом называют его человеком, а уже затем говорят про его болезни или особенности. Таким образом, сегодня в ходу нейтральное выражение – «people with special needs» (люди с особыми потребностями) или люди с инвалидностью.
При этом, пару лет назад Минтруду РФ пришлось даже опровергать в прессе новости о том, что они планируют исключить употребление термина «инвалид».
Под катом краткий рассказ о том, как мы искали в нашу компанию людей с этими самыми особыми потребностями.
Как запустить Windows на Mac с M1

Правда, есть одна небольшая загвоздка. Microsoft не продаёт коммерческую версию Windows для ARM-процессоров. Та версия операционной системы, которая устанавливается на гибриды Surface и лэптопы с чипсетами Qualcomm, поставляется с ними из коробки. То есть купить её отдельно и накатить на свой компьютер нельзя. Поэтому тем, кто хочет воспользоваться Parallels Desktop для M1, придётся обратиться к тестовой сборке Windows Developer Preview.
- Пройдите регистрацию в программе Windows Insider Program;
- Перейдите по этой ссылке и скачайте ARM-версию Windows;
- Запустите Parallels Desktop и создайте виртуальную машину;
- Следуйте инструкциям по установке, появляющимся на экране;
- Завершите установку Windows и пользуйтесь новой ОС на Mac.
Важно понимать, что тестовая сборка Windows на то и тестовая, что ещё не вышла в релиз. Поэтому можно ожидать, что она будет работать не совсем так, как финальная версия, которую Microsoft выпустила в люди
Нет, это не альфа-билд, который полон багов, но всё-таки в некоторых аспектах операционка может вести себя несколько нетипично. Однако, когда выйдет официальная коммерческая версия Windows для ARM, лучше будет установить именно её. Parallels Desktop позволит это сделать без каких-либо затруднений.
Все собеседования и найм работников у нас теперь удаленные
В Parallels 10 офисов по всему миру: в России, США, Европе, Китае, Японии, Австралии, Великобритании и других странах. Поэтому масштабы нынешнего коронакалипсиса стали нам понятны достаточно рано. В компании еще в феврале этого года всем сотрудникам рекомендовали «припарковать» зарубежные поездки. Потом в офисах появились санитайзеры и средства индивидуальной защиты. Следом мы начали готовиться к переводу персонала на 100% удаленный режим работы. Сегодня всем сотрудникам Parallels рекомендуется работать из дома. Более того, в России, мы решили оставаться дома до 30 мая. Несмотря на «удаленку» вся команда в деле! Код пишется, бизнес движется.
Голова из интернета
В условиях карантина число всевозможных онлайн вебинаров превысило все мыслимые и немыслимые пределы. Ощущение, что люди поделились на две группы: у одних «ужас-ужас» по всем фронтам, как в известном анекдоте, а у других внезапно открылись чакры, поправилась карма и поперло чистое знание об «успешном успехе». Собственно, об этом и хотелось поговорить. Тем более, что благодаря данной заметке, сам одной ногой встаю на эту зыбкую почву. Того, что говорят «ушлые гуры», касаться не буду, а вот как это выглядит для зрителей, обсудить хочется. Тем более, что никогда не знаешь, вдруг и тебя коснется просветление и придется вебинарить на миллионную аудиторию.
Checking Software Settings
macOS
- Make sure that you have ample free disk space on your startup disk. Visit this article for more details: KB 123553.
- Use Activity Monitor to check what unwanted applications consume a high percentage of system resources (CPU and Memory).
- Make sure Time Machine backup is not taking place while you’re running the virtual machine. The backup process may slow down overall system performance.
Parallels Desktop Preferences
-
Make sure you’re using the latest build for your Parallels Desktop version:
On the macOS menu bar click Parallels Desktop icon > Check for Updates…. Download and install the updates if available.
- Store your virtual machine within Mac HD (internal storage). Running a VM from external USB disk or NAS may significantly lower VM performance.
- Be careful running several virtual machines at once — each VM consumes considerable amount of resources and may slow down overall computer performance.
- Try disabling antivirus on the Mac side. Alternatively, you may add adding Parallels Desktop/virtual machine location to a white list that antivirus maintains of known good software.
Virtual Machine Configuration
-
Shutdown your VM > open its configuration > switch to Hardware tab > CPU & Memory > make sure that the number of processors (CPUs) selected is not maximum (e.g. 4 out of 4). In most cases, half of total CPUs will provide optimal performance. Assigning more than a half of CPUs for the virtual machine may cause performance degradation for both Mac and VM.
-
Make sure that memory allocation is within the recommended level. Similarly to processors, best practice is to assign half of Mac’s total RAM.
NOTE: The amount of memory assigned to a virtual machine must be multiple of 1024 or Windows may behave inappropriately. E.g 1024, 2048, 3072 MBs and so on.
-
Under Advanced settings make sure that ‘Parallels’ hypervisor is selected.
-
Under Hardware > Graphics set Memory option to Auto (Recommended).
-
Under Options > Optimization set Resource usage to No limit.
-
If your Mac uses an HDD or a Fusion Drive (not SSD), make sure that the option TRIM is disabled: go to Hardware > Hard Disk > Advanced Settings > uncheck Enable TRIM option.
- Start your virtual machine and test performance.
Совет 2. Используйте функцию Приостановить
При прекращении работы с приложениями в гостевой ОС, пользователь закрывает свои программы в ней и останавливает виртуальную машину. Когда гостевые приложения снова нужны, процесс повторяется в обратном порядке. Все это отнимает кучу времени, которое легко экономится использованием функций Приостановить/Возобновить.
Вместо того, чтобы закрывать Parallels Desktop, выберите .

Виртуальная Windows 10 может «замораживается» вместе с открытыми в ней приложениями. Это удобно, когда нужно быстро возобновить работу виртуальной машины со всеми открытыми программами. Причём система выводится из спячки буквально за секунды вместе со всеми ранее открытыми программами.

Состояние памяти и состояние внутренних устройств виртуального компьютера сохраняется на диске в виде файла. Этот файл потом «разворачивается» средствами Parallels Desktop.
При использовании функции Приостановить/Возобновить вместо одной-двух минут ожидания загрузки Windows и её приложений на все про все уходит от силы секунд десять. Экономия времени колоссальная.
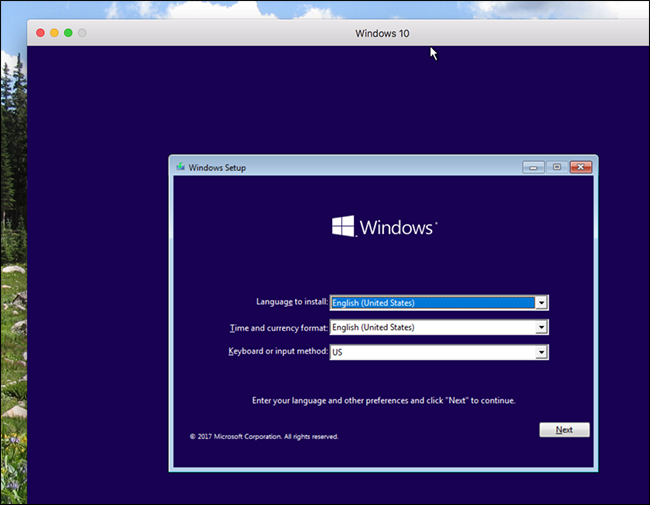
Install Windows from your source
1. Create a new virtual machine
Open Parallels Desktop.app from the Applications folder and select File > New.

Select Install Windows or another OS from DVD or image file, then click Continue.

2. Select an installation media
You may install Windows from a DVD or an .iso disc image, or a bootable USB drive.
Important: Windows installation files with an .exe extension can be used only to upgrade an existing Windows virtual machine (VM). If you are performing a new Windows installation, the .exe file will not work. Please contact local retailer to request either a physical disc or an .iso image.
Installation Assistant will detect available installation media automatically for installing Windows.

You can also switch to manual mode and choose the source for Windows installation.

3. Enter your Windows License Key
Click Continue. Enter Windows license key for automatic Windows activation upon installation.
If you don’t have a Windows license key, click Continue and then Skip. To activate Windows later follow instructions from the article.

When you are ready, click Continue.
4. Select Windows Edition
Starting with Parallels Desktop 16 you can choose Windows edition before starting Windows installation, so you don’t have to select Windows edition during installation.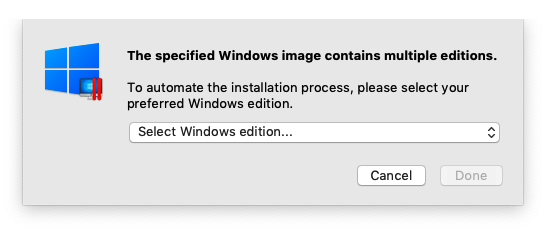

Choose the required Windows edition and click Done button.
5. Select how you want to use Windows
Select how you want to use Windows in Parallels Desktop for Mac Standard Edition:
- Productivity
- Games only
And in Parallels Desktop for Mac Pro and Business Editions:
- Software development
- Software testing
- Design

To learn more about virtual machine profiles, visit KB 123878.
6. Specify a name and location
Name: You may specify a name for your virtual machine.
Location: The default location for Parallels Desktop virtual machines is /Users/username/Parallels/.
If you want to change your default virtual machine settings select Customize settings before installation. These settings can also be changed easily after installation.

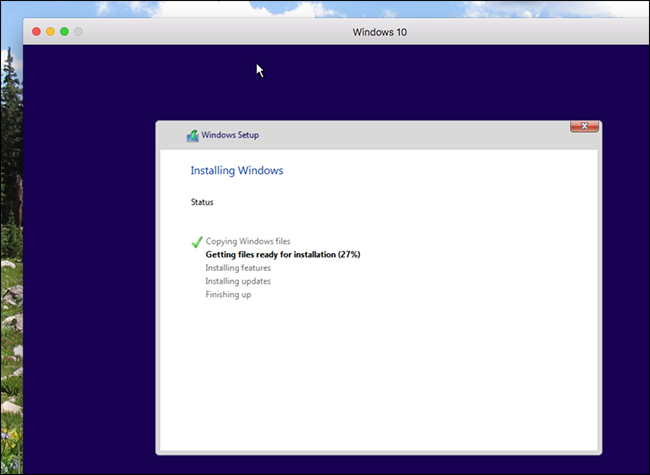
7. Begin the installation
Click Continue and Windows installation will begin. Once Windows is installed, launch it by opening a Windows application or by clicking the Power button in the Control Center.